Tuesday, September 29, 2009

Make Your Own Dog Food Part 2: Puppy Stir Fry

0 Comments

Yes, I make our dogs' food. It's not as hard as you might think. If you haven't yet, please read Part 1 to find out how to get started with this.

In Part 1 I told you how I found meat on sale, rounded up a few things I had in my freezer, bought some store-brand veggies and blackeye peas, and a pound of rice. I had cooked the meat and rice when I left off last time.

I make such a huge batch, I got three of my big bowls and divided up the cooked meat and rice equally (eye-balling it).

I opened up the frozen veggies and peas and divided them into the three bowls, too. I added a splash of olive oil to each bowl. Okay, more like 1/4 cup of olive oil to each bowl. I find this keeps our dogs' coats soft and the dry skin at bay.

I stirred each bowl. I bought a few sets of containers with red lids just for the dog food, so we can easily identify in the fridge or freezer what is for dogs and what is for people (although, it would be fine for people to eat this stir-fry). I filled each container. All but one container goes in the freezer, the other in the fridge to use.

This batch made 13 containers, that will last almost two months. I feed our little guys 1/8 of a
container per day. They also get table scraps from messy toddlers on week days.

Until a few months ago, all I fed them was this mix. We were given some commercial dog food and to use it up, I mixed about 1/4 cup of the dog food in each bowl with the Puppy Stir Fry mix. The commercial dog food ran out, and I went back to just the Stir Fry. Well, our pups let us know that they really missed the dog food, so we made a decision to continue to mix commercial dog food with the Puppy Stir Fry.

Also, I put about a teaspoon of Brewers Yeast in
their food.

You can see in the photos that we make the dogs wait until they get the 'okay' from us before they eat. Then, of course, they gobble it up :)


Share/Save/Bookmark
Posted by Picasa

Monday, September 28, 2009

Make Your Own Dog Food Part 1: Puppy Stir Fry

0 Comments

You read that right! I make our dogs' food. Why? Well, it started a few years ago when there were several dog foods being recalled and pets all over were getting sick. I decided to research and see if it was possible. It is!

BEFORE you change your pet's diet discuss it with your vet and do your own research. Here's more on what I did and where to start: Click Here.

There are three main ingredients: Meat, vegetables & rice. I don't think in all the years I've made this, I've made the same batch twice. I use whatever is on sale, leftovers, or whatever I have on-hand.

When I first started making this, I made small batches more often. I now make 6 to 8 weeks' worth at a time.

If you wanted to make this every few days an easy recipe would be:

1 pouch minute rice
1 pouch tuna
1 can mixed vegetables, drained

All you would have to do is cook the rice and mix the rest up. How long it would last, would depend on the size of your dog and how much they need to eat.

So, last week I wanted to make a big batch. I went shopping and there was ground turkey on sale so I got 2.5 pounds. I found some store brand frozen veggies and blackeye peas. I also got a pound of brown rice. I had a pound of ground beef and a few boneless, skinless chicken breasts on-hand.

Now to make some sense of it all!

I cooked the chicken in the microwave, but now that I think about it, I should have chopped it in bite-sized pieces and tossed it in with the ground meat.

I cooked the ground meat on the stove, siring until cooked.

For the first time, I decided to cook the rice all at once in my new-to-me all-in-one slow cooker. It turned out fine, despite the mess it made. A whole pound of rice makes a lot!

To find out how it all comes together, stay tuned for part 2.........


Share/Save/Bookmark
Posted by Picasa

Saturday, September 26, 2009

Leftover Mixup: Spaghetti Eggs

6 Comments

Easy, easy, easy!
Spaghetti Eggs

Melt a tablespoon or two of butter in a frying pan over medium heat.
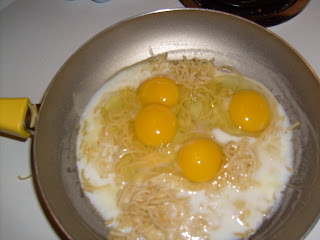
Add a handful of leftover, cooked spaghetti. In the photo below, I was serving it to young toddlers, so I cut up the spaghetti into small pieces. But for me, I like to leave it long.


Crack 2 to 4 eggs, depending on how many you are feeding and how much spaghetti you have in the pan, over the spaghetti, and add a splash of milk. I was feeding 4 toddlers, so I decided to use 4 eggs.

Stir with a spatula to scramble the eggs. Cook until eggs are done.

Easy add ins would be sliced bell peppers, diced onions, or other veggies you like.

This is one of my favorite ways to use up leftover spaghetti. I cooked the above the night before I served them to the toddlers, and put them in the fridge. The next day, about 90 minutes before lunch, I put them in the mini crock pot, and they were heated through by lunch time. The toddlers ate it all as usual!

This post is linked to:


Spaghetti  on Foodista


Share/Save/Bookmark

Posted by Picasa

Thursday, September 24, 2009

Easy Mac 'N Cheese Pie

8 Comments

Yummy and easy--some of my favorite words, especially when used together! This pie is both of those!
I found this recipe

Impossibly Easy Mac ’n Cheese Pie at Betty Crocker and couldn't wait to try it.


1cup uncooked elbow macaroni (3 1/2 oz)
2cups shredded Cheddar cheese (8 oz)
1/2cup Bisquick Mix
1 1/2cups milk
1/4teaspoon red pepper sauce
2eggs

1.Heat oven to 400°F. Spray 9-inch glass pie plate with cooking spray. Place uncooked macaroni in pie plate. Sprinkle with 1 3/4 cups of the cheese.
2.In medium bowl, stir remaining ingredients until blended. Pour into pie plate.
3.Spray sheet of foil with cooking spray; place sprayed side down over pie plate. Bake 20 minutes. Uncover and bake 5 to 10 minutes longer or until knife inserted in center comes out clean. Sprinkle with remaining 1/4 cup cheese. Bake 1 to 2 minutes longer or until cheese is melted. Let stand 5 minutes before serving.

I followed the recipe except omitted the pepper sauce. I don't like hot stuff and I was feeding it to toddlers.
Above is the sprinkle of cheese and I put it back in the oven for 5 minutes. Below, is the finished pie.

I served it with banana slices and peas and carrots to the toddlers. The loved it, as usual.

I read the reviews at the website and they were half loved it and half hated it. Here is my review. Yes, it is bland, but isn't mac & cheese sort of bland? I could easily see some French's Fried onions as a topper or you could add veggies in the pie. Another idea would be to add a half pound of cooked ground beef or turkey--that would make it a great meal! The macaroni was cooked, although a few around the edges were firm, but still very eatable. I had a 'toddler meal' leftover and put it in the freezer for an easy meal next week--just put in the mini crock pot with a splash of water to heat.

Share/Save/Bookmark
Posted by Picasa

Tuesday, September 22, 2009

Crock Pot Italian Beef

0 Comments

I sort of invented this recipe putting together a few ideas from different places.

Crock Pot Italian Beef

2 Tbs. olive oil
1 to 2 Tbs. onion flakes
12 oz. can of ginger ale
1 Tbs. vinegar
6 oz. can tomato paste
1 envlope Italian salad dressing mix
2 Tbs. Worcestershire sauce
1 tsp. sugar
dash each, salt and pepper
1 1/2 pounds lean beef stew meat (cubed)

Mix all but meat in a bow, whisking together until well blended. Add the meat and stir.

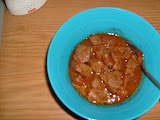
Since I am the only one eating this, I put one portion into the crockpot and three other portions into quart-sized Ziploc bags and into the freezer. For a family, you could freeze the whole thing or your could cook it right away.

For the frozen ones, I thaw in the fridge overnight, then put in the crock pot, cover and cook on low for 6-8 hours, until beef is fork-tender.

I have it plain, but it would be good over rice, too.

This post is being linked to:


Share/Save/Bookmark
Posted by Picasa

Rolls That Didn't Work For Me

6 Comments

I found a great, easy recipe for rolls and I couldn't wait to give it a try!

Poor Man's Roll

From: Hillbilly Housewife

1 cup of flour
1/2 cup of milk
1/4 cup of mayonaise

Mix ingrediants together. Grease cupcake pan. Pour mixture half way in each portion of pan.
Bake at 350 degrees until brown. About thirty minutes. I use a tooth pick to check. Done if clear.


I followed the directions, except I used my mini muffin pan, instead of a standard one. Since I used the min pan, I reduced the baking time to 20 minutes. I check it and it didn't seem done. I set the timer for 5 minutes more--still not done. UGH. I check with a toothpick and it comes out clean. It didn't rise or brown. Here's what it looked like when I decided to get it out of the oven:

Even though they didn't "look" done, they were. They were just the right size for a toddler to pick up. The toddlers have eaten them a few times with no complaints. They were quite flat for me.


The only thing I can think of is that I was suppose to use self rising flour? I don't keep that on hand, so I can't try that any time soon. Have you made this recipe work for you?

This post is being linked to:


Share/Save/Bookmark
Posted by Picasa

Sunday, September 20, 2009

Quick Fix Ahead: Brown-N-Serve Sausage

2 Comments

Brown 'N Serve sausage is not usually something I buy, but there was a great sale on them, so I got a few. After getting it home, I had to try--would it work in my mini crock pot?

I put them all in, first thing in the morning with a 'lid-full' of water.

By lunch, they were defrosted and heated through and brown on the ends. I cut them lengthwise, then in chunks. I served them with pancakes, potatoes, and a banana. They loved it!


If you're one to like it super brown and crispy, this method would not be best for you. They taste fine, though.


This post is linked to:


Share/Save/Bookmark
Posted by Picasa

Thursday, September 17, 2009

Bakin' Bacon

13 Comments

I'm not that excited about frying bacon. The grease gets everywhere and it you have to watch it and flip it.

My preferred method is to bake bacon. Yep, you can bake it in the oven!

Bakin' Bacon

Preheat oven to 400 degrees.

Spray a roasting pan (the kind with the slits for the juices to to the bottom and a try underneath) with cooking spray.

Arrange bacon in a single layer on a roasting pan.

Bake for 20 to 25 minutes, to desired crispness.
Drain on paper towel.

Put in a Ziploc bag and store in the refrigerator or freezer.

Perfect for making my
Bacon & Cheese Muffin or to just have on-hand.

Savings tip--in the last photo, I did the same thing with a package of bacon ends. You can find bacon ends in the meat department at your grocery store. They're not usually by the bacon, but somewhere else. Ask the butcher. It's generally cheaper per pound and tastes just as good! It's just not in uniform shape and size. I like to bake them, then use them to crumble for salads or use in other recipes.


PS--I couldn't get the photos to cooperate! Sorry it's a mess at the bottom.


Bacon on Foodista


Share/Save/Bookmark


Posted by Picasa
Related Posts Plugin for WordPress, Blogger...